
South Metro: (952) 960-9411
A broken garage door spring can stop your door from opening, leaving you stuck and frustrated. Many homeowners think about doing their own garage door spring replacement. However, this garage door repair requires precision, the right tools, and a strong focus on safety. In this guide, we will show you how to replace a garage door spring. We will also help you know when it is time to get a new one. Lastly, we will explain why getting professional help is often the best choice.
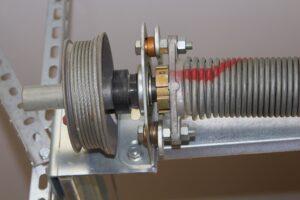
What Are Garage Door Springs and Why They Matter
Garage door springs carry the weight of your garage door, making it possible to open and close smoothly. As the springs wear out, you may notice the door feels heavier. The door might produce loud noises or fail to remain stationary.
Most garage doors use either:
- Torsion springs (mounted above the door)
- Extension springs (located on either side of the door)
Knowing the type you have is the first step before attempting any repair. Contact our team for assistance to determine which type of springs you have installed on your door.
Signs Your Garage Door Spring Needs Replacing
Catching spring issues early can prevent bigger (and more expensive) repairs. Look for these warning signs:
- The garage door won’t open, even though the opener runs.
- The garage may produce a sharp snapping or banging sound when a spring fails.
- The door looks uneven or crooked when opening.
- Visible gaps appear in the spring coils.
Observing any of these conditions strongly indicates that someone should replace the springs.
How to Replace Garage Door Spring: Step-by-Step Guide
Before beginning, let’s ensure that safety remains our highest priority! Garage door springs are under heavy tension, and mishandling them can cause serious injury. If you’re unfamiliar with tools or mechanical fixes, it’s advisable to contact an expert for assistance. The below is how you will perform a torsion spring replacement.
Step 1: Gather Tools and Materials
You’ll require winding bars, a socket wrench, a ladder, a vice grip, and the appropriate replacement springs.
Step 2: Release Tension in the Springs
Insert the winding bar into the winding cone to pin off the spring against the strut. Using a socket wrench, loosen the set screws. Using winding bars, carefully unwind the broken torsion spring. Always proceed slowly and with control.
Step 3: Loosen the Drums
Using you’re socket wrench, loosen both drums to allow for the removal of broken torsion spring(s).
Step 4: Remove the Old Spring
Remove one of the drums, slide the broken spring off the torsion bar, and remove it.
Step 5: Install the New Spring
Slide the replacement spring into place, replace the drum, then reattach the center bracket to the stationary cone.
Step 6: Set the Drums
Starting with the left side drum, seat the cable bead into the backside of the drum and twist counter-clockwise until the cable is tight. While holding tension, tighten both of the set screws onto the torsion bar, then apply a vice grip to maintain tension on the cable. Do the same on the right-hand side drum.
Step 7: Wind the Spring
With winding bars, carefully wind the new spring to the correct tension, following manufacturer guidelines. Once the required turns are completed, tighten the set screws to the torsion bar.
Step 8: Test the Door
Remove the clamps and check that the door opens and that the door closes smoothly, then make adjustments if needed.
Why Professional Replacement May Be the Better Option
Some DIY guides show how to replace a garage door spring, but the job is dangerous and can be a serious safety risk. Professionals have the required expertise, tools, and training to carry out the job both safely and efficiently. Plus, a professional spring replacement often comes with warranties and guarantees.
Hiring a professional ensures your garage door operates smoothly and helps prevent damage to other components. Learn more about our service areas to see how we can assist you.
Disclaimer: The information in this blog is for educational purposes only. Garage door spring replacement is a dangerous repair that should only be performed by trained professionals. Attempting to replace springs on your own may result in serious injury or property damage. Metro Garage Door is not responsible for injuries, damages, or losses resulting from DIY garage door spring replacement. For your safety, we strongly recommend contacting a professional technician.
Keep Your Garage Door Running Smoothly
Replacing a garage door spring is not a beginner-level repair, but with this guide, you now understand what’s involved. If you’d rather leave it to the experts, Metro Garage Door is here to help!